
Qwen3.6发布27B Dense模型,提供旗舰级编程能力,魔搭Serverless训练服务Day0支持
Qwen3.6 的第二款开源模型来啦——社区呼声极高的 Dense 模型 Qwen3.6-27B,现已正式登陆魔搭社区,魔搭Serverless训练服务已Day 0支持!
Github:https://github.com/QwenLM/Qwen3.6
Blog:https://qwen.ai/blog?id=qwen3.6-27b
Model:
- https://www.modelscope.cn/models/Qwen/Qwen3.6-27B
- https://www.modelscope.cn/models/Qwen/Qwen3.6-27B-FP8
这是一款对个人开发者更友好的模型:
- Dense架构,部署友好——不需要 MoE 路由,单机多卡即可起服务,显存占用、推理延迟、吞吐表现都更可预期,对私有化部署和本地推理极度友好。
- 智能体编程能力打到旗舰级——SWE-bench、Terminal-Bench、SkillsBench 等 Agentic Coding 核心榜单全面领先同规模模型,部分指标追平 Claude 4.5 Opus。
- 原生多模态 + 思考/非思考双模式——保留 Qwen3.6 系列的 Thinking Mode 能力,同时支持图像、视频、文档理解。
Qwen3.6-27B 也证明了Dense模型在 Agentic Coding 这个最吃工程能力的赛道上,依然能跑出旗舰表现。

模型表现
自然语言
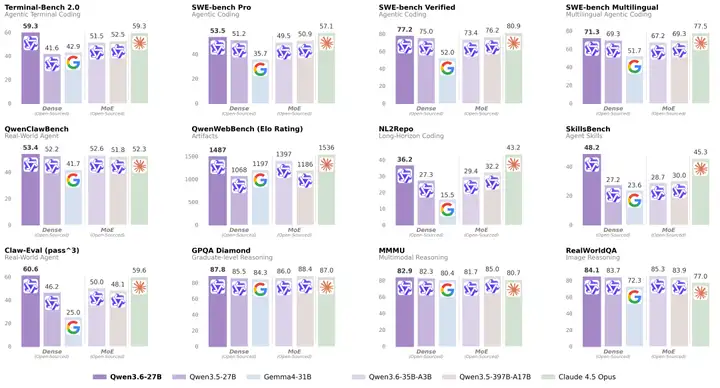
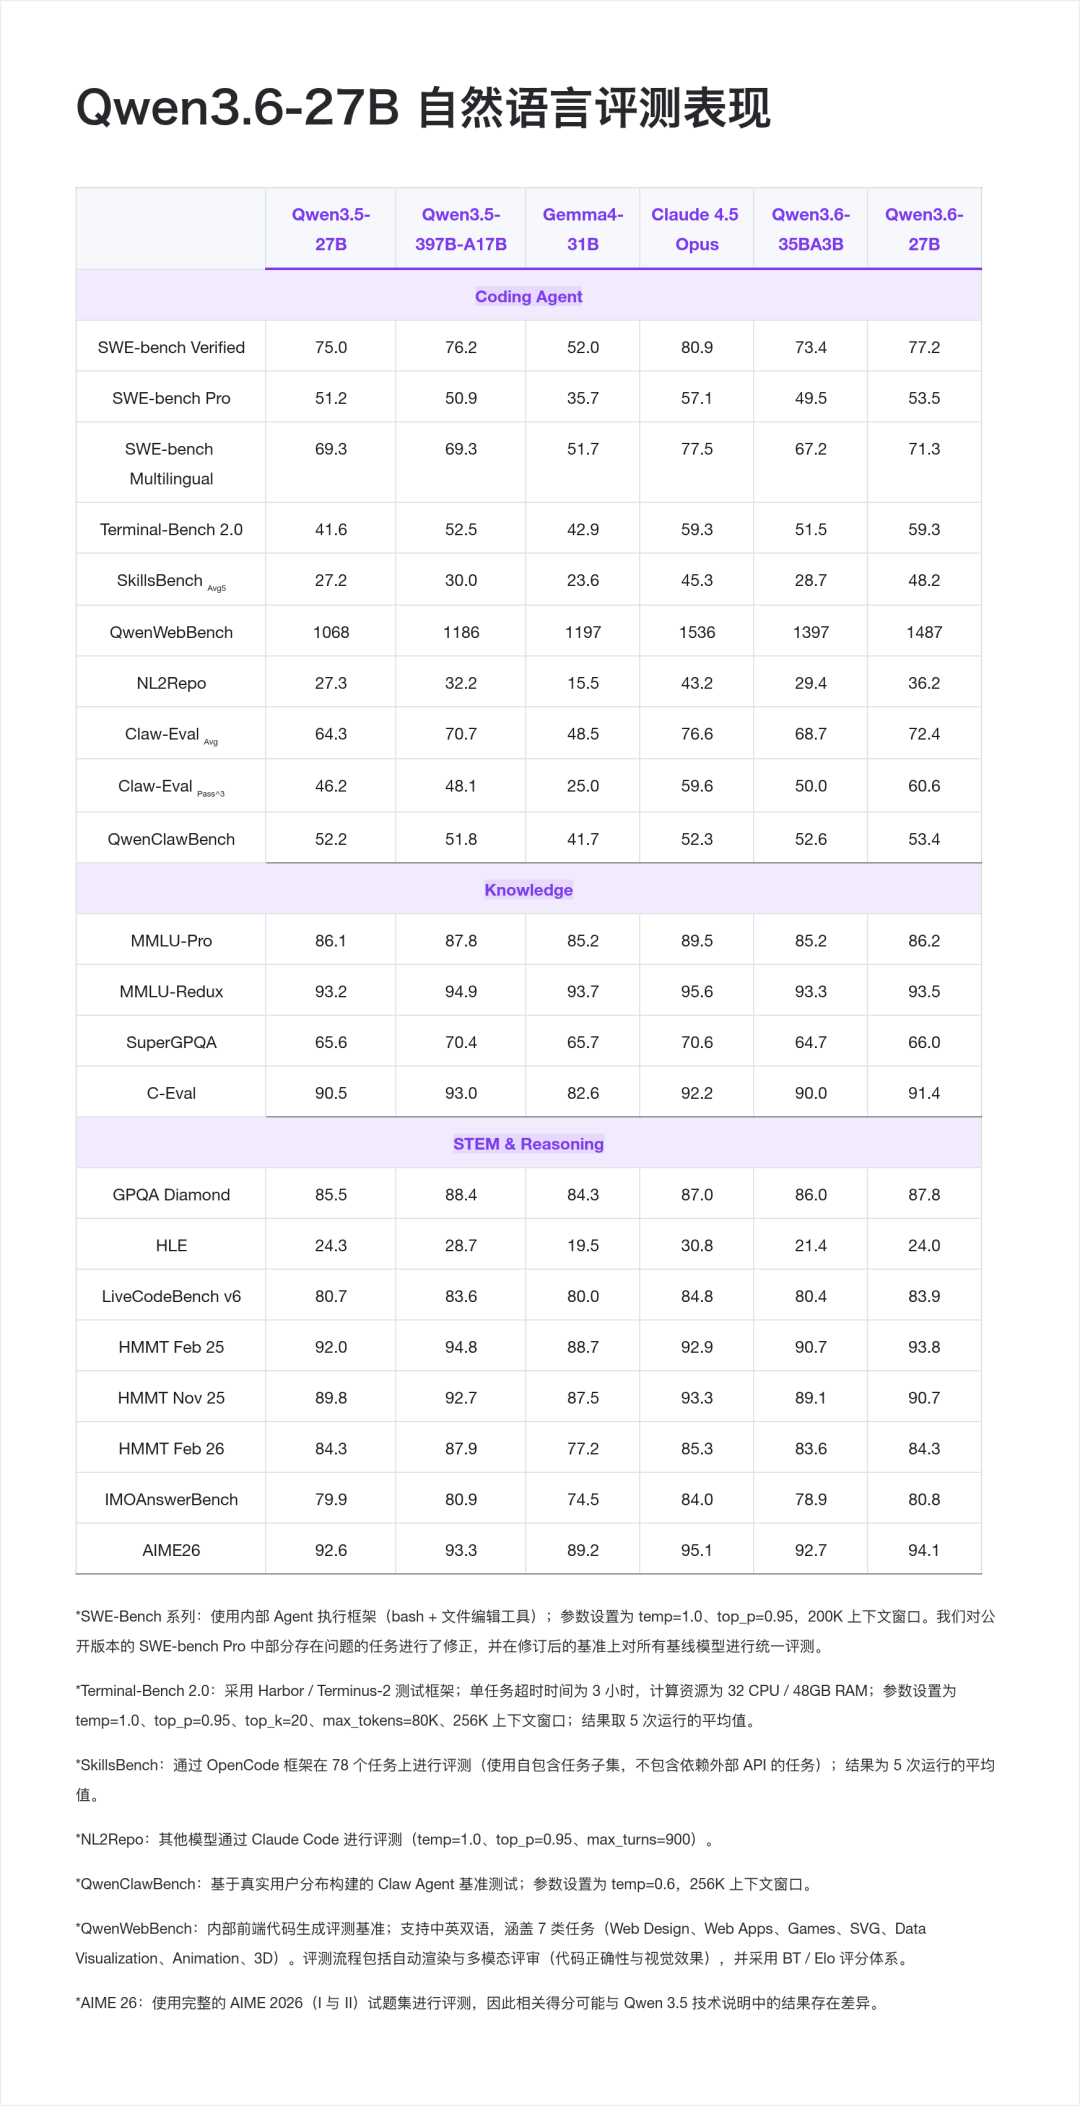
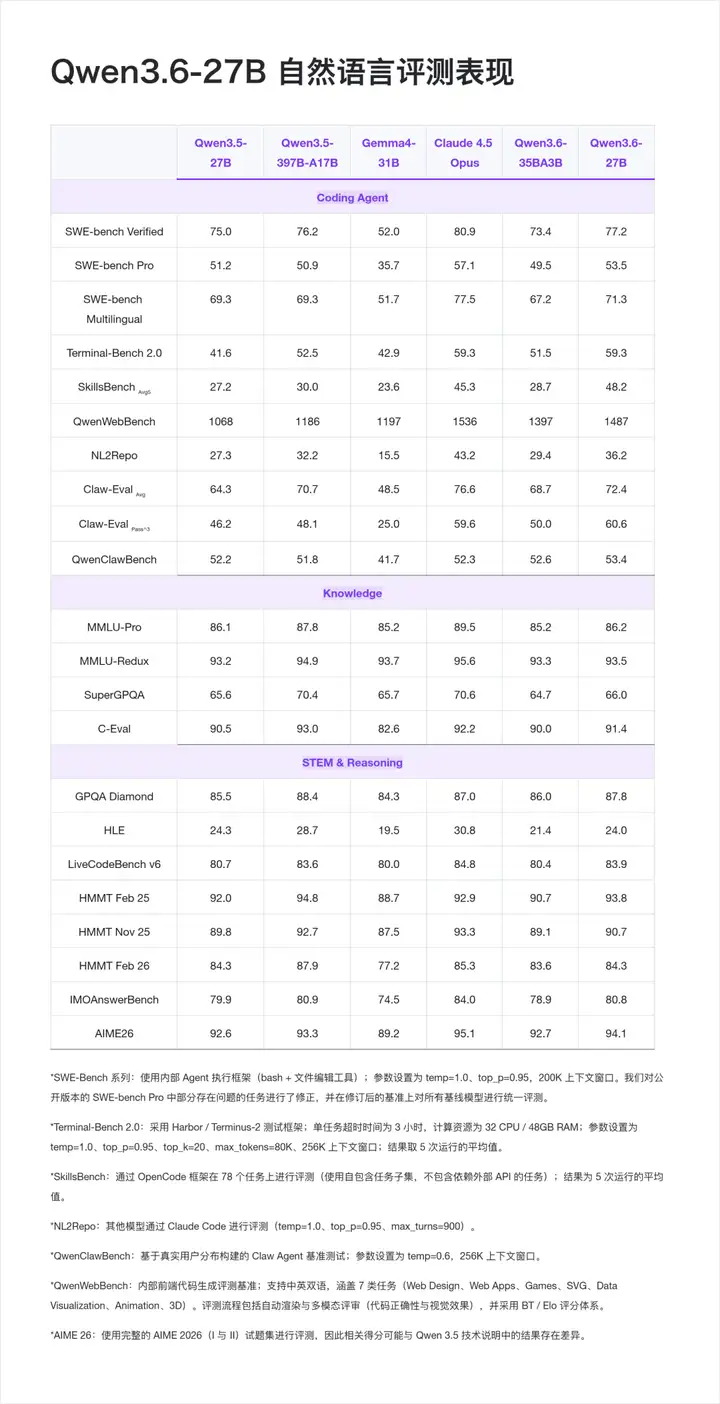
从官方公布的评测结果来看,Qwen3.6-27B 在Dense模型的智能体编程、推理&通用能力上都表现突出。
在Coding Agent 基准上,值得注意的:
- Terminal-Bench 2.0 打平 Claude 4.5 Opus (59.3 vs 59.3), 这是一个端到端 Agentic Terminal Coding 基准,考察模型在真实 Shell 环境下的长程任务执行能力;
- SkillsBench 从 30.0 直接拉到 48.2,+18.2 分的跨代提升,意味着在多技能组合的真实开发任务上,模型的泛化明显变强。
- Claw-Eval Pass^3 达到 60.6,超过 Claude 4.5 Opus(59.6), Pass^3 是"同一任务连续三次都要做对"的严苛指标,反映智能体的稳定性。
基础能力也没有掉队,从 GPQA Diamond 博士级科学推理 87.8 的表现上可见,27B Dense模型做到这个水平,基本可以覆盖绝大多数企业级复杂推理场景。
视觉语言
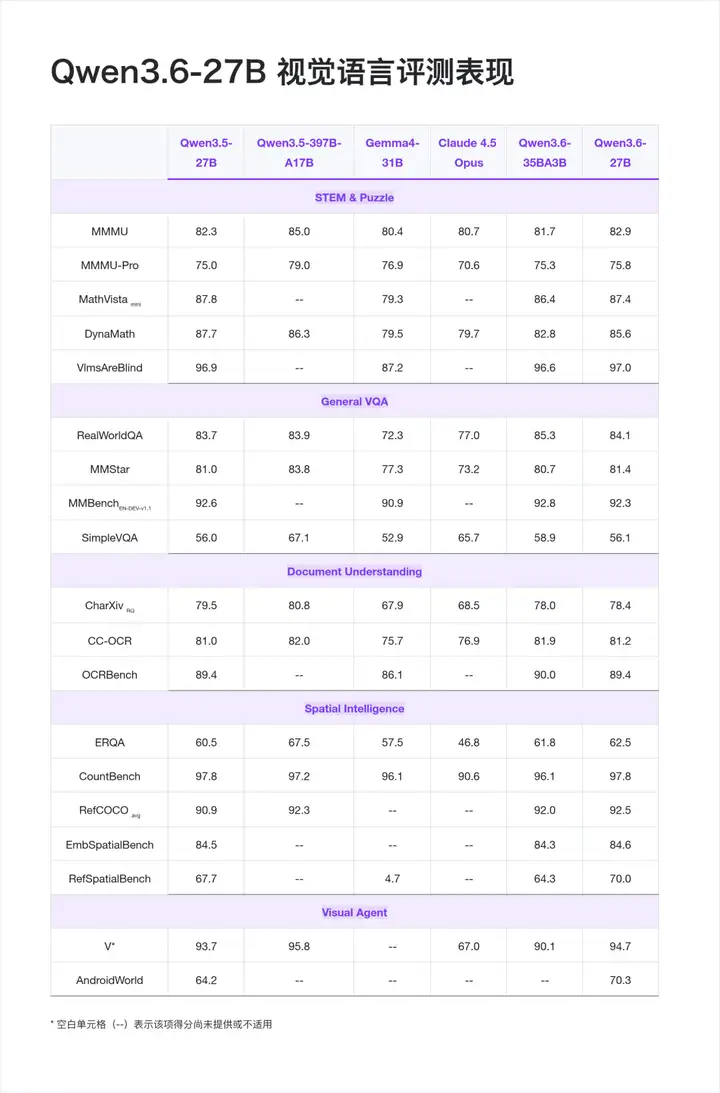
Qwen3.6-27B 原生支持视觉语言输入,并同样支持 VL 思考/非思考模式,能够处理图像、视频与文本的多模态理解,支持视觉推理、文档理解和视觉问答等任务。
值得注意的是,AndroidWorld 70.3 是本次发布里比较突出的一项——作为移动端 GUI Agent 的基准,意味着模型可以作为 Mobile Agent 的核心驱动,直接参与屏幕理解、点击决策、任务执行闭环。做移动端自动化、UI Agent、RPA 的开发者可以重点关注。

模型实战
部署&推理
模型权重已在ModelScope 发布,兼容 Transformers、vLLM、SGLang、KTransformers 等主流推理框架。
官方推荐的采样参数如下:
- 思考模式下一般任务使用 temperature=1.0、top_p=0.95、presence_penalty=1.5;
- 精确编码任务使用 temperature=0.6、presence_penalty=0.0;
- 非思考模式下一般任务使用 temperature=0.7、top_p=0.8。
SGLang
建议在全新环境中安装 sglang>=0.5.10 来运行 Qwen3.6,安装命令如下:
uv pip install sglang[all]
以下命令将在 http://localhost:8000/v1 创建 API 端点:
标准版本:以下命令可在 8 张 GPU 上使用张量并行创建最大上下文长度为 262,144 tokens 的 API 端点。
SGLANG_USE_MODELSCOPE=true python -m sglang.launch_server --model-path Qwen/Qwen3.6-27B --port 8000 --tp-size 8 --mem-fraction-static 0.8 --context-length 262144 --reasoning-parser qwen3
工具调用:若需支持工具调用,可使用以下命令。
SGLANG_USE_MODELSCOPE=true python -m sglang.launch_server --model-path Qwen/Qwen3.6-27B --port 8000 --tp-size 8 --mem-fraction-static 0.8 --context-length 262144 --reasoning-parser qwen3 --tool-call-parser qwen3_coder
多 Token 预测(MTP):推荐使用以下命令启用 MTP:
SGLANG_USE_MODELSCOPE=true python -m sglang.launch_server --model-path Qwen/Qwen3.6-27B --port 8000 --tp-size 8 --mem-fraction-static 0.8 --context-length 262144 --reasoning-parser qwen3 --speculative-algo NEXTN --speculative-num-steps 3 --speculative-eagle-topk 1 --speculative-num-draft-tokens 4
vLLM
建议在全新环境中安装 vllm>=0.19.0 来运行 Qwen3.6,安装命令如下:
uv pip install vllm --torch-backend=auto
uv pip install modelscope
以下命令将在 http://localhost:8000/v1 创建 API 端点:
标准版本:以下命令可在 8 张 GPU 上使用张量并行创建最大上下文长度为 262,144 tokens 的 API 端点。
VLLM_USE_MODELSCOPE=true vllm serve Qwen/Qwen3.6-27B --port 8000 --tensor-parallel-size 8 --max-model-len 262144 --reasoning-parser qwen3
工具调用:若需支持工具调用,可使用以下命令。
VLLM_USE_MODELSCOPE=true vllm serve Qwen/Qwen3.6-27B --port 8000 --tensor-parallel-size 8 --max-model-len 262144 --reasoning-parser qwen3 --enable-auto-tool-choice --tool-call-parser qwen3_coder
多 Token 预测(MTP):推荐使用以下命令启用 MTP:
VLLM_USE_MODELSCOPE=true vllm serve Qwen/Qwen3.6-27B --port 8000 --tensor-parallel-size 8 --max-model-len 262144 --reasoning-parser qwen3 --speculative-config '{"method":"qwen3_next_mtp","num_speculative_tokens":2}'
纯文本模式:以下命令将跳过视觉编码器和多模态分析,以释放更多内存用于 KV 缓存:
VLLM_USE_MODELSCOPE=true vllm serve Qwen/Qwen3.6-27B --port 8000 --tensor-parallel-size 8 --max-model-len 262144 --reasoning-parser qwen3 --language-model-only
Transformers
运行 Qwen3.6 需要最新版的 transformers:
pip install -U "transformers[serving]"
同时请确保已安装 modelscope, torchvision 和 pillow
然后,运行 transformers serve 以在 http://localhost:8000/v1 启动一个带有 API 端点的服务器;如果可用,它会将模型加载到加速器上:
modelscope download --model Qwen/Qwen3.6-27B --local_dir <YOUR_MODEL_DIR>
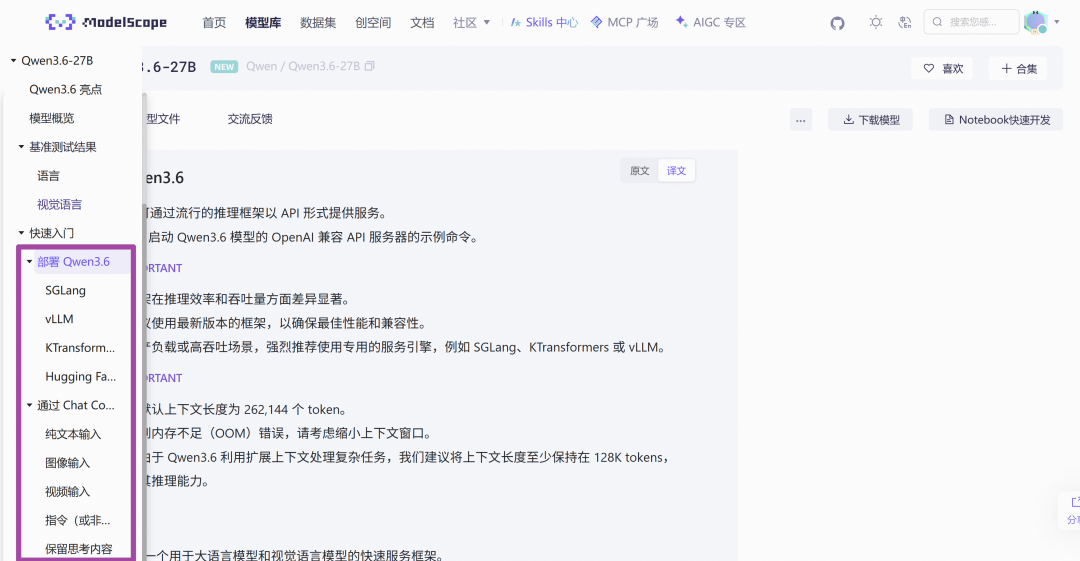
更多模型部署推理实战cookbook,详见模型详情:
https://modelscope.cn/models/Qwen/Qwen3.6-27B
模型训练
ms-swift (https://github.com/modelscope/ms-swift) 是魔搭开源的微调训练框架,Day-0 为Qwen3.6-27B 模型提供了基于Transformers/Megatron等多种后端进行训练的支持。同时魔搭开源的Twinkle✨项目(https://github.com/modelscope/twinkle%EF%BC%89%EF%BC%8C%E5%88%99%E4%BD%BF%E5%BE%97Serverless%E7%9A%84%E6%A8%A1%E5%9E%8B%E8%AE%AD%E7%BB%83%E6%88%90%E4%B8%BA%E5%8F%AF%E8%83%BD%EF%BC%8C%E6%88%91%E4%BB%AC%E4%B9%9FDay-0 提供了对Qwen3.6-27B的支持,并部署了对应的模型训练服务开放给广大开发者试用。
基于 ms-swift 的微调和RL
由于使用megatron后端训练支持MTP,序列packing以及FP8训练等,这里将介绍使用megatron对Qwen3.6进行微调和强化学习。使用transformers后端进行训练请参考:https://swift.readthedocs.io/zh/-cn/latest/BestPractices/Qwen3/_5-Best-Practice.html
环境准备
pip install -U ms-swift
pip install -U "transformers==5.2.*" "qwen_vl_utils>=0.0.14" peft liger-kernel
pip install -U "flash-linear-attention>=0.4.2" --no-build-isolation
pip install -U git+https://github.com/Dao-AILab/causal-conv1d --no-build-isolation
pip install "flash-attn==2.8.3" --no-build-isolation
# megatron环境准备请参考: https://swift.readthedocs.io/zh-cn/latest/Megatron-SWIFT/Quick-start.html
# vllm (torch2.10) for RL
pip install -U "vllm>=0.17.0"
# 对于强化学习(RL)训练,需要覆盖 vLLM 的默认安装版本
pip install -U "transformers==5.2.*"
微调
训练脚本如下:
# 4 * 40GiB, 7min
PYTORCH_CUDA_ALLOC_CONF='expandable_segments:True' \
NPROC_PER_NODE=4 \
CUDA_VISIBLE_DEVICES=0,1,2,3 \
IMAGE_MAX_TOKEN_NUM=1024 \
VIDEO_MAX_TOKEN_NUM=128 \
FPS_MAX_FRAMES=12 \
megatron sft \
--model Qwen/Qwen3.6-27B \
--save_safetensors true \
--merge_lora true \
--dataset 'AI-ModelScope/alpaca-gpt4-data-zh#500' \
'AI-ModelScope/alpaca-gpt4-data-en#500' \
'swift/self-cognition#500' \
'AI-ModelScope/LaTeX_OCR:human_handwrite#2000' \
--load_from_cache_file true \
--add_non_thinking_prefix true \
--loss_scale ignore_empty_think \
--split_dataset_ratio 0.01 \
--tuner_type lora \
--lora_rank 8 \
--lora_alpha 32 \
--target_modules all-linear \
--tensor_model_parallel_size 2 \
--micro_batch_size 1 \
--global_batch_size 2 \
--recompute_granularity full \
--recompute_method uniform \
--recompute_num_layers 1 \
--num_train_epochs 1 \
--finetune true \
--freeze_llm false \
--freeze_vit true \
--freeze_aligner true \
--cross_entropy_loss_fusion true \
--lr 1e-4 \
--lr_warmup_fraction 0.05 \
--min_lr 1e-5 \
--output_dir megatron_output/Qwen3.6-27B \
--eval_steps 200 \
--save_steps 200 \
--max_length 4096 \
--mtp_num_layers 1 \
--packing true \
--dataloader_num_workers 8 \
--dataset_num_proc 8 \
--no_save_optim true \
--no_save_rng true \
--sequence_parallel true \
--attention_backend flash \
--padding_free false \
--model_author swift \
--model_name swift-robot
训练结束后,使用以下脚本对验证集进行推理:
PYTORCH_CUDA_ALLOC_CONF='expandable_segments:True' \
CUDA_VISIBLE_DEVICES=0,1 \
IMAGE_MAX_TOKEN_NUM=1024 \
VIDEO_MAX_TOKEN_NUM=128 \
FPS_MAX_FRAMES=12 \
swift infer \
--model megatron_output/Qwen3.6-27B/vx-xxx/checkpoint-xxx-merged \
--stream true \
--enable_thinking false \
--max_new_tokens 512 \
--load_data_args true
如果您需要自定义数据集微调模型,你可以将数据准备成以下格式,并在命令行中设置`--dataset train.jsonl --val_dataset val.jsonl`,其中验证集为可选。
{"messages": [{"role": "user", "content": "浙江的省会在哪?"}, {"role": "assistant", "content": "浙江的省会在杭州。"}]}
{"messages": [{"role": "user", "content": "<image><image>两张图片有什么区别"}, {"role": "assistant", "content": "前一张是小猫,后一张是小狗"}], "images": ["/xxx/x.jpg", "/xxx/x.png"]}
{"messages": [{"role": "system", "content": "你是个有用无害的助手"}, {"role": "user", "content": "<image>图片中是什么,<video>视频中是什么"}, {"role": "assistant", "content": "图片中是一个大象,视频中是一只小狗在草地上奔跑"}], "images": ["/xxx/x.jpg"], "videos": ["/xxx/x.mp4"]}
强化学习(RL)
使用 Megatron 后端对 Qwen3.6-27B 模型进行 GRPO LoRA 训练,在 DAPO-Math-17k 数据集上训练,使用swift内置的 accuracy 作为奖励函数。
SYSTEM_PROMPT="""You are a helpful math assistant. Solve the problem step by step and put your final answer within \\boxed{}."""
CUDA_VISIBLE_DEVICES=0,1,2,3,4,5,6,7 \
NPROC_PER_NODE=8 \
PYTORCH_CUDA_ALLOC_CONF='expandable_segments:True' \
megatron rlhf \
--rlhf_type grpo \
--model Qwen/Qwen3.6-27B \
--save_safetensors true \
--enable_thinking false \
--merge_lora true \
--context_parallel_size 1 \
--tensor_model_parallel_size 2 \
--pipeline_model_parallel_size 2 \
--dataset open-r1/DAPO-Math-17k-Processed \
--system "$SYSTEM_PROMPT" \
--num_train_epochs 1 \
--global_batch_size 64 \
--micro_batch_size 1 \
--steps_per_generation 2 \
--num_generations 8 \
--reward_funcs accuracy \
--use_vllm true \
--vllm_mode colocate \
--vllm_gpu_memory_utilization 0.5 \
--vllm_tensor_parallel_size 2 \
--vllm_max_model_len 9192 \
--max_length 1000 \
--max_completion_length 8192 \
--tuner_type lora \
--target_modules all-linear \
--lr 5e-5 \
--bf16 true \
--beta 0.00 \
--epsilon 0.2 \
--epsilon_high 0.28 \
--dynamic_sample false \
--overlong_filter true \
--loss_type grpo \
--sleep_level 1 \
--offload_model true \
--offload_bridge false \
--offload_optimizer true \
--logging_steps 1 \
--recompute_granularity full \
--recompute_method uniform \
--recompute_num_layers 1 \
--finetune \
--dataloader_num_workers 8 \
--dataset_num_proc 8 \
--no_save_optim \
--no_save_rng \
--save_steps 20 \
--attention_backend flash \
--temperature 1.0 \
--padding_free false \
--sequence_parallel true \
--log_completions true \
--report_to tensorboard swanlab
魔搭Twinkle✨训练服务
基于魔搭开源的Twinkle✨项目,我们开源了完整的类似Tinker的Client-Server分离的模型训练API系统,提供了全新的服务化训练方式。基于Twinkle✨,你可以在本地或者自己的Ray集群部署一个支持多租户试用的训练服务。
随着Qwen3.6-27B的开源,我们为这个模型提供了预先部署好的训练服务。基于这个Twinkle✨的训练服务,你只需要一个能联网的笔记本(CPU即可)即可通过API来完成训练。Twinkle✨提供了原生的API,同时也能兼容Tinker的API,目前已经支持了PT、SFT、DPO、GRPO等多种训练方式。
准备1:获取自己的魔搭token:https://www.modelscope.cn/my/access/token
准备2:安装Twinkle✨:
pip install twinkle-kit[tinker] -U
将如下代码保存为python文件,例如train.py:
import os
from tqdm import tqdm
from tinker import types
from twinkle import init_tinker_client
from twinkle.data_format import Message, Trajectory
from twinkle.template import Template
from twinkle.dataloader import DataLoader
from twinkle.dataset import Dataset, DatasetMeta
from twinkle.preprocessor import SelfCognitionProcessor
from twinkle.server.common import input_feature_to_datum

# Initialize the Tinker client before importing ServiceClient
init_tinker_client()

from tinker import ServiceClient

# The base model to fine-tune / evaluate
base_model = 'Qwen/Qwen3.6-27B'
base_url = 'http://www.modelscope.cn/twinkle'

def train():
# Step 1: Prepare the dataset

# Load the self-cognition dataset from ModelScope (first 500 examples)
dataset = Dataset(dataset_meta=DatasetMeta('ms://swift/self-cognition', data_slice=range(500)))

# Apply the chat template matching the base model (max 256 tokens per sample)
dataset.set_template('Qwen3_5Template', model_id=f'ms://{base_model}', max_length=256)

# Replace placeholder names with custom model/author identity
dataset.map(SelfCognitionProcessor('twinkle模型', 'twinkle团队'), load_from_cache_file=False)

# Tokenize and encode the dataset into model-ready input features
dataset.encode(batched=True, load_from_cache_file=False)

# Wrap the dataset into a DataLoader that yields batches of size 8
dataloader = DataLoader(dataset=dataset, batch_size=8)

# Step 2: Initialize the training client


service_client = ServiceClient(
base_url=base_url,
api_key=os.environ.get('MODELSCOPE_TOKEN')
)

# Create a LoRA training client for the base model (rank=16 for the LoRA adapter)
training_client = service_client.create_lora_training_client(base_model=base_model, rank=16)

# Step 3: Run the training loop

for epoch in range(2):
print(f'Epoch {epoch}')
for step, batch in tqdm(enumerate(dataloader)):
# Convert each InputFeature into a Datum for the Tinker API
input_datum = [input_feature_to_datum(input_feature) for input_feature in batch]

# Send data to server: forward + backward pass (computes gradients)
fwdbwd_future = training_client.forward_backward(input_datum, 'cross_entropy')

# Optimizer step: update model weights with Adam
optim_future = training_client.optim_step(types.AdamParams(learning_rate=1e-4))

# Wait for both operations to complete
fwdbwd_result = fwdbwd_future.result()
optim_result = optim_future.result()

# Compute weighted average log-loss per token for monitoring
# logprobs = np.concatenate([output['logprobs'].tolist() for output in fwdbwd_result.loss_fn_outputs])
# weights = np.concatenate([example.loss_fn_inputs['weights'].tolist() for example in input_datum])
# print(f'Loss per token: {-np.dot(logprobs, weights) / weights.sum():.4f}')
print(f'Training Metrics: {optim_result}')

# Save a checkpoint after each epoch
save_future = training_client.save_state(f'twinkle-lora-{epoch}')
save_result = save_future.result()
print(f'Saved checkpoint to {save_result.path}')

def eval():
# Step 1: Load the trained LoRA checkpoint for inference

# Path to a previously saved LoRA checkpoint (twinkle:// URI)
weight_path = 'twinkle://20260212_174205-Qwen_Qwen2_5-7B-Instruct-51edc9ed/weights/twinkle-lora-2'

service_client = ServiceClient(base_url=base_url, api_key=os.environ.get('MODELSCOPE_TOKEN'))
sampling_client = service_client.create_sampling_client(model_path=weight_path, base_model=base_model)

# Step 2: Prepare the chat prompt

# Build a multi-turn conversation to test the model's self-cognition
template = Template(model_id=f'ms://{base_model}')

trajectory = Trajectory(
messages=[
Message(role='system', content='You are a helpful assistant'),
Message(role='user', content='你是谁?'),
]
)

input_feature = template.batch_encode([trajectory], add_generation_prompt=True)[0]

input_ids = input_feature['input_ids'].tolist()

# Step 3: Generate responses

prompt = types.ModelInput.from_ints(input_ids)
params = types.SamplingParams(
max_tokens=50, # Maximum tokens to generate
temperature=0.2, # Low temperature for more focused responses
stop=['\n'] # Stop at newline
)

# Sample 8 independent completions
print('Sampling...')
future = sampling_client.sample(prompt=prompt, sampling_params=params, num_samples=8)
result = future.result()

# Decode and print each response
print('Responses:')
for i, seq in enumerate(result.sequences):
print(f'{i}: {repr(template.decode(seq.tokens))}')

if __name__ == '__main__':
train() # Uncomment to run training
# eval() # Run evaluation / inference
运行训练脚本即可:
MODELSCOPE_TOKEN='你的魔搭token' python train.py
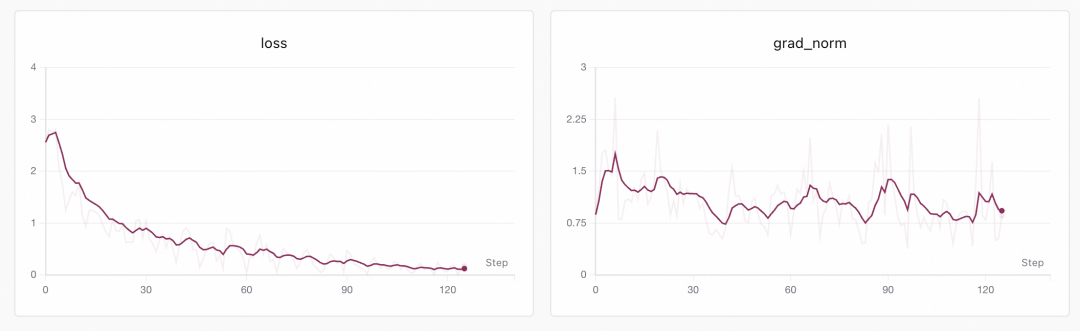
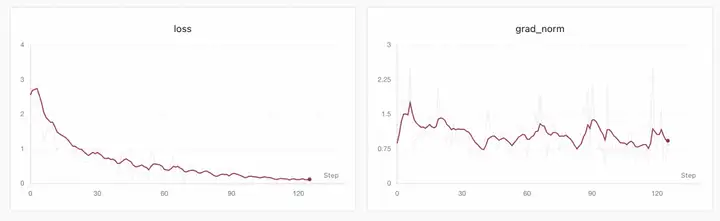
等待训练完成。如果你使用swanlab等实验记录工具,代码的收敛曲线就可以展现出来:
等待训练完成。日志中可以看到最后保存的lora权重路径:
Saved checkpoint to twinkle://20260422_xxxxxx-Qwen_Qwen3_6-27B-xxx/weights/twinkle-lora-x
这就是训练完成后的checkpoint服务器目录。你可以使用它进行推理:
# Tinker-Compatible Client - Sampling / Inference Example
#
# This script demonstrates how to use a previously trained LoRA checkpoint
# for text generation (sampling) via the Tinker-compatible client API.
# The server must be running first (see server.py and server_config.yaml).

import os
from tinker import types

from twinkle.data_format import Message, Trajectory
from twinkle.template import Template
from twinkle import init_tinker_client

# Step 1: Initialize Tinker client
init_tinker_client()

from tinker import ServiceClient

base_model = 'Qwen/Qwen3.6-27B'
base_url = 'http://www.modelscope.cn/twinkle'

# Step 2: Define the base model and connect to the server
service_client = ServiceClient(
base_url=base_url,
api_key=os.environ.get('MODELSCOPE_TOKEN')
)

# Step 3: Create a sampling client by loading weights from a saved checkpoint.
# The model_path is a twinkle:// URI pointing to a previously saved LoRA checkpoint.
# The server will load the base model and apply the LoRA adapter weights.
sampling_client = service_client.create_sampling_client(
model_path='twinkle://20260422_xxxxxx-Qwen_Qwen3_6-27B-xxx/weights/twinkle-lora-x',
base_model=base_model
)

# Step 4: Load the tokenizer locally to encode the prompt and decode the results
print(f'Using model {base_model}')

template = Template(model_id=f'ms://{base_model}')

trajectory = Trajectory(
messages=[
Message(role='system', content='You are a helpful assistant'),
Message(role='user', content='Who are you?'),
]
)

input_feature = template.encode(trajectory, add_generation_prompt=True)

input_ids = input_feature['input_ids'].tolist()

# Step 5: Prepare the prompt and sampling parameters
prompt = types.ModelInput.from_ints(input_ids)
params = types.SamplingParams(
max_tokens=128, # Maximum number of tokens to generate
temperature=0.7,
stop=['\n'] # Stop generation when a newline character is produced
)

# Step 6: Send the sampling request to the server.
# num_samples=1 generates 1 independent completions for the same prompt.
print('Sampling...')
future = sampling_client.sample(prompt=prompt, sampling_params=params, num_samples=1)
result = future.result()

# Step 7: Decode and print the generated responses
print('Responses:')
for i, seq in enumerate(result.sequences):
print(f'{i}: {repr(template.decode(seq.tokens))}')
好了,现在你已经通过Twinkle✨训练服务得到了一个可用lora了。
除了SFT之外,你还可以基于这种Serverless的方式,通过Twinkle✨服务实现:
- 进行GRPO训练
- 将lora下载到本地
- 将lora上传到modelhub
- 进行DPO训练
- 训练多模态数据集
- 定制训练组件和Loss...
更多用法请参考官方样例:https://www.modelscope.cn/organization/twinkle-kit
点击即可跳转模型链接

ModelScope旨在打造下一代开源的模型即服务共享平台,为泛AI开发者提供灵活、易用、低成本的一站式模型服务产品,让模型应用更简单!
更多推荐

 0
0 0
0- 0


 已为社区贡献984条内容

所有评论(0)